
Best Bambu Studio Settings for Easy Support Removal

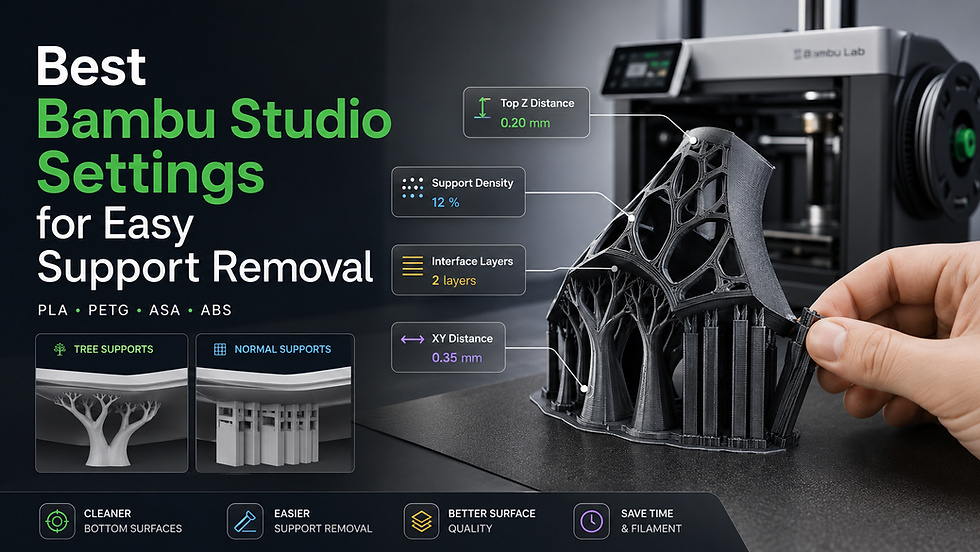
Supports are one of those things every 3D printer owner has to deal with sooner or later. They help hold up overhangs, bridges, and awkward shapes, but if the settings are too tight, they can weld themselves to the print and turn cleanup into a fight.
If you are using a Bambu Lab printer like the P1S, P2S, X1C, A1, or A1 Mini, Bambu Studio gives you a lot of control over supports. The trick is knowing which settings actually matter.
The honest answer is this: there is no one perfect support setting for every model. A decorative print, a functional bracket, and a detailed figure may all need different support settings. But there are some good starting points that make supports much easier to remove without completely destroying the underside of your print.
The Most Important Setting: Top Z Distance
If your supports are hard to remove, the first setting I would adjust is Top Z Distance.
Top Z Distance controls the gap between the top of the support and the bottom of the printed part. The smaller the gap, the cleaner the supported surface usually looks, but the harder the support is to remove. The larger the gap, the easier the support comes off, but the underside of the print may look rougher.
For PLA with a 0.4 mm nozzle, I like to start around:
Top Z Distance: 0.20 mm to 0.24 mm
If the supports are still too hard to remove, increase it slightly:
Easier removal: 0.24 mm to 0.28 mm
If the underside looks too rough, lower it slightly:
Cleaner underside: 0.16 mm to 0.20 mm
Do not just crank this setting way up and expect magic. Too much gap will make the filament sag, especially on flat undersides. Easy removal always comes with a tradeoff.
Best Starter Settings for Easy Support Removal
These are good starting settings for PLA on a Bambu printer with a 0.4 mm nozzle.
Setting | Recommended Starting Point |
Support Type | Tree for complex shapes, Normal Snug for flat functional parts |
Support Style | Tree Default / Organic or Normal Snug |
Top Z Distance | 0.20 mm to 0.24 mm |
Bottom Z Distance | 0.20 mm |
Support/object XY Distance | 0.35 mm to 0.45 mm |
Top Interface Layers | 1 to 2 layers |
Top Interface Spacing | 0.4 mm to 0.6 mm |
Support Wall Loops | 0 or 1 |
Support Density | 8% to 12% |
On Build Plate Only | On when possible |
Remove Small Overhangs | On |
Support Critical Regions Only | On for tree supports when possible |
These are not “perfect” settings. They are a solid baseline. Start here, print a test, then adjust based on what the part looks like.
Tree Supports vs. Normal Supports
Bambu Studio gives you different support types, and the one you choose matters.
Tree supports are usually easier to remove on organic shapes, figures, curved parts, and models with small contact points. They use branch-like structures that touch the model in fewer places.
Normal supports are better for larger flat areas, square parts, brackets, trays, mechanical parts, and prints where you need a more stable support structure.
For most decorative prints, I would start with tree supports.
For functional prints with flat undersides, I would try normal snug supports.
Use “On Build Plate Only” When You Can
The On Build Plate Only setting keeps supports from starting on top of the model itself. This can help reduce scarring because the supports only grow from the bed.
Use this when the model allows it.
Do not use it blindly. Some models need supports to start from another part of the print. If you turn this on and the slicer can no longer reach an overhang, that area may fail.
Interface Layers: Better Surface or Easier Removal
Interface layers are the layers between the main support structure and the printed part. They help support the print better and improve the underside surface, but they can also make supports harder to remove if they are too dense or too close.
For easier removal, try:
Top Interface Layers: 1 to 2
If the underside looks bad, increase to:
Top Interface Layers: 2 to 3
If supports are stuck too hard, reduce the interface layers or increase the Top Z Distance slightly.
For most everyday PLA prints, I would not start with a heavy interface. It can make supports grab too hard, especially on small detailed parts.
Support/object XY Distance
The Support/object XY Distance controls the side-to-side gap between the support and the model.
If this is too close, supports can fuse to side walls and leave scars. If it is too far away, the supports may not hold the overhang well enough.
A good starting point is:
Support/object XY Distance: 0.35 mm to 0.45 mm
For easier removal, lean toward 0.45 mm.
For cleaner, tighter support near details, lean toward 0.35 mm.
Use Support Blockers and Support Painting
Auto supports are useful, but they are not always smart. Sometimes Bambu Studio will add supports where you do not need them.
That means more cleanup, more print time, and more chances to damage the part.
Use support blockers or support painting to control where supports go. This is especially helpful on clocks, signs, decorative pieces, and flat 3D printed products where only a few areas actually need support.
The best support is the one you never had to print.
Using Support Filament with AMS
If you have an AMS, you can use a separate support interface material. This can make support removal much easier and can improve the underside of the part.
For example, many people use a different material only for the support interface layer, not the entire support structure. This saves material and reduces the number of filament changes.
A good setup is:
Support Base: Same filament as the model. Support Interface: Support filament or a material that separates well. Top Z Distance: 0 mm when using proper support interface material. Interface Layers: 2 to 3
Using support filament for the entire support structure usually wastes time and material. For most prints, only use it for the interface layer.
PLA and PETG as Support Interfaces
PLA and PETG do not bond to each other as strongly as PLA-to-PLA or PETG-to-PETG. That makes them useful as support interface materials in some cases.
For example:
PLA model: PETG interface; PETG model: PLA interface
This can work well, but it does add filament changes and extra print time. It can also create problems if the purge amount is too low or the materials contaminate each other.
For quick shop prints, I usually keep it simple and tune normal supports first. For high-detail prints where the bottom surface matters, using a support interface material can be worth it.
Best Settings for Fast, Easy Cleanup
If your main goal is easy cleanup and you do not care about a perfect underside, try this:
Setting | Easy Removal Setup |
Support Type | Tree |
Top Z Distance | 0.24 mm to 0.28 mm |
Support/object XY Distance | 0.45 mm |
Top Interface Layers | 1 |
Support Density | 8% |
On Build Plate Only | On if possible |
Remove Small Overhangs | On |
This setup should make supports come off easier, but the underside may be a little rough.
Best Settings for Cleaner Supported Surfaces
If you care more about the underside looking better, try this:
Setting | Cleaner Surface Setup |
Support Type | Normal Snug or Tree Strong |
Top Z Distance | 0.16 mm to 0.20 mm |
Support/object XY Distance | 0.35 mm |
Top Interface Layers | 2 to 3 |
Top Interface Spacing | 0.3 mm to 0.4 mm |
Support Density | 10% to 15% |
This should support the print better, but removal may take more effort.
Best All-Around PLA Settings
For most PLA prints on a Bambu printer with a 0.4 mm nozzle, this is where I would start:
Setting | All-Around PLA Setup |
Support Type | Tree or Normal Snug |
Top Z Distance | 0.22 mm |
Bottom Z Distance | 0.20 mm |
Support/object XY Distance | 0.40 mm |
Top Interface Layers | 2 |
Top Interface Spacing | 0.5 mm |
Support Density | 10% |
Support Wall Loops | 0 or 1 |
On Build Plate Only | On when possible |
Remove Small Overhangs | On |
This gives a good balance between removable supports and acceptable underside quality.
Don’t Forget Print Orientation
Before changing a bunch of slicer settings, rotate the model and check if you can reduce supports altogether.
Sometimes turning the model 45 or 90 degrees removes half the support material. Sometimes cutting the model into two parts and gluing or screwing it together gives a better result than fighting bad support areas.
Bad orientation is one of the biggest reasons supports become a nightmare.
Final Thoughts
For easy support removal in Bambu Studio, start with Top Z Distance. That setting makes the biggest difference. After that, adjust support type, interface layers, XY distance, and whether supports are only built from the plate.
My recommended starting point for PLA is:
Top Z Distance: 0.22 mm Support/object XY Distance: 0.40 mm Top Interface Layers: 2Support Density: 10%Tree supports for complex shapes Normal Snug supports for flat functional parts
The goal is not to make supports perfect. The goal is to make them do their job, come off clean, and not waste your time after the print is done.

Comments